Activate Wake-on-LAN (WOL) for Jetway NC9C

If you’re looking for the Wake-on-LAN (WOL) support in Jetways NC9C BIOS, you might not find it directly. This is because the WOL settings are a bit hidden. To activate WOL on a NC9C, follow these instructions:

  1. 1. Open BIOS by pressing DEL immediately at startup
  2. 2. Navigate to “Power Management Support” and press Enter
  3. 3. Set ACPI Suspend Type to S3(STR)
  4. 4. Disable the ERP Function (then the WOL settings will be visible)
  5. 5. Enable “Wake-Up by PCI Card”

To improve the support of WOL it might be useful to update BIOS to version A06 at least. The changelog tells

Supports PCIE Wake-on-LAN function after AC power loss.

Please be aware that updating BIOS is at your own risk. To get WOL working, ensure that your operating system has WOL enabled, too.

Fix a corrupted Linux Mint LVM2 filesystem with LUKS encryption

A corrupted LVM2 filesystem with LUKS encryption is indicated by a broken boot process. Specifically when you get a command line prompt after entering the passphrase of your LUKS partition. The command line has the prefix (initramfs) and you’re able to enter commands.

In a situation like this you boot from a Linux Mint CD. After Mint booted, open a terminal. At first you have to determine your encrypted LVM2 disk. To do so, type:

sudo fdisk -l|grep Linux|grep -Ev 'swap'

Sample output:

mint@mint ~ $ sudo fdisk -l|grep Linux|grep -Ev 'swap'
/dev/sda1  *       2048    999423    997376  487M 83 Linux
/dev/sda5       1001472 134215679 133214208 63.5G 83 Linux

In this case, /dev/sda5 is the affected device. Now open this device with LUKS and enter the passphrase for encryption:

sudo cryptsetup luksOpen /dev/sda5 tofix

Enable LVM2:

sudo vgchange -ay

Find out the name of the logical volume to be repaired (unter Linux Mint it usually is /dev/mint-vg/root):

mint@mint /dev/mapper $ sudo lvdisplay
  --- Logical volume ---
  LV Path                /dev/mint-vg/root
  LV Name                root
  VG Name                mint-vg
  LV UUID                dJ3EAN-IdjA-VM3P-3eg1-Ox33-8rVW-zXrYuK
  LV Write Access        read/write
  LV Creation host, time mint, 2017-01-13 18:04:20 +0000
  LV Status              available
  # open                 0
  LV Size                59.52 GiB
  Current LE             15236
  Segments               1
  Allocation             inherit
  Read ahead sectors     auto
  - currently set to     256
  Block device           252:1
   
  --- Logical volume ---
  LV Path                /dev/mint-vg/swap_1
  LV Name                swap_1
  VG Name                mint-vg
  LV UUID                cBgoCq-bLOM-Vwns-qEVV-ZhNZ-XPHh-oxgFyg
  LV Write Access        read/write
  LV Creation host, time mint, 2017-01-13 18:04:20 +0000
  LV Status              available
  # open                 0
  LV Size                4.00 GiB
  Current LE             1024
  Segments               1
  Allocation             inherit
  Read ahead sectors     auto
  - currently set to     256
  Block device           252:2

Finally you’re able to run the fsck command on the encrypted LVM2 partition:

sudo fsck -C -V /dev/mint-vg/root

Good luck.
Install latest version of duplicity on Debian Wheezy

First make a folder for the duplicity sources:
mkdir /home/myuser/duplicity
cd /home/myuser/duplicity

Download the latest version of duplicity, e.g.:
wget http://code.launchpad.net/duplicity/0.6-series/0.6.24/+download/duplicity-0.6.24.tar.gz

Unpack it in the current folder:
tar -xvf duplicity-0.6.24.tar.gz

For compiling and installing python applications we need a two more packages:
apt-get install python-setuptools python-dev

Now we are ready to install duplicity by changing in the extracted folder and running the setup:
cd duplicity-0.6.24
python setup.py install

UTF-8 encoded AJAX calls

Sometimes you want to do a HTTP POST via jQuery/AJAX with enforced UTF-8 encoding. Therefore you have to use the method $.ajaxSetup, cause to set the encoding in $.ajax doesn’t seem to be enough.

Here is an example out of an application using jQuery UI Autocompletion:

1
2
3
4
5
6
7
8
9
10
11
12
13
14
15
16
17
18
19
20
21
22
  $(document).ready(function() {
    $("#mydropdown").autocomplete({
      source: function(request, response) {
 
        $.ajaxSetup({
          contentType: "application/x-www-form-urlencoded;charset=utf-8",
          type: "POST"
        });
 
        $.ajax({
          url: '/mypath/myapp/myajax.php',
          dataType: 'json',
          data: request,
          success: function(data) {
            response(data);
          }
        })
      },
      minLength: 2,
      messages: { noResults: "", results: "" }
    });
  });

How to enable Digest Authentification over HTTP in Apache 2.2

The often used basic Authentification for HTTP transmits sensitive userdata (username & password) in a very insecure way. The transmitted data can be transformed into plaintext in just a few seconds. A more secure way to accomplish Authentification is the method via digest auth. It makes use of the MD5 hashing algorithm.

Enabling digest auth in Apache 2.2 is rather simple. At first you have to activate the module mod_auth_digest. Therefore search the following line in apache/conf/httpd.conf:

1
#LoadModule auth_digest_module modules/mod_auth_digest.so

and change it to:

1
LoadModule auth_digest_module modules/mod_auth_digest.so

Afterwards you have to create a user file. For this purpose there exists the tool “htdigest.exe”, which can be found in apache/bin:

htdigest -c /path/to/your/new/digest.passwd realm username

Note: realm is the name of the closed area (displayed when the browser asks you for login). Amongst other things the realm is used for generating the response.

Finally you have to create a file called .htaccess in the folder you want to protect. Fill the file with the following, respectively make it fit to your needs:

1
2
3
4
5
6
7
AuthType Digest
AuthDigestProvider file
AuthUserFile /path/to/your/new/digest.passwd
AuthName "NameOfTheRealm"
AuthDigestDomain /YourPath/ http://YourDomain.com/YourPath
AuthDigestNonceLifetime 300
require valid-user

Restart Apache now. Afterwards you should be prompted to enter your username and password by accessing http://yourdomain.com/yourpath via browser.

My favorite plugins for Miranda IM

After using Miranda IM for a few years now, I’m still enthusiastic about it.
There are a couple of plugins which make this messenger so powerful.
Installing plugins in Miranda IM is rather simple: just copy the downloaded
.dll-file into your Miranda install folder (default is C:\Program Files\Miranda IM)\Plugins.
In the following I want to introduce my favorite ones:

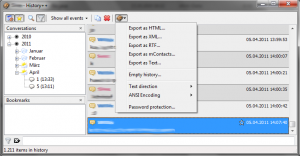
History++
The standard history functionality of Miranda IM is very rudimentary.
With the History++-Plugin you add some useful features concerning the history.
For example it provides a comfortable search & filter feature, bookmarks,
functions for exporting, password protection, and so on.

History++ plugin for Miranda IM

History++ plugin for Miranda IM

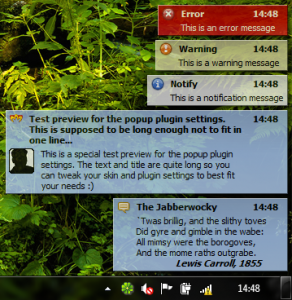
PopUp Plus
For notification purposes it might be useful to install a plugin for viewing popups,
e.g. PopUp Plus. It offers a wide range of settings. For noticing contacts going online
you should install Contact Status Notification additionally.

PopUp Plus plugin for Miranda IM

PopUp Plus plugin for Miranda IM

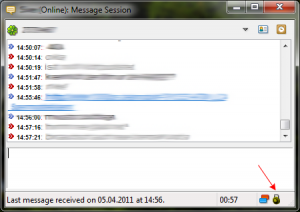
OTR (Off-the-Record)
The “official” ICQ-Client doesn’t offer any possibility to encrypt conversations.
Messages are transfered in plaintext, what is insecure. Experienced users are
able to read your conversations by sniffing your network. With the OTR plugin
you can enable encryption for messaging.

Off-the-Record plugin for Miranda IM

Off-the-Record plugin for Miranda IM

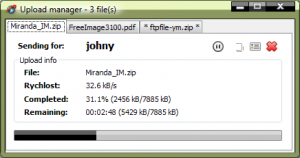
FTP File YM
Sometimes the filetransfer over Miranda IM to a contact might not work or you want to
send a file to several contacts. In this case FTP could be an alternative solution. With FTP File YM
you can upload and manage files via FTP in a very comfortable way. After uploading a file succesfully
the plugin is able to automatically paste the download URL in the message window or delete the file
after a given delay. Of course you need a FTP server (respectively webspace) to get this working.

FTP File YM (picture taken from addons.miranda-im.org)

FTP File YM (picture taken from addons.miranda-im.org)

Tomcat 6 and UTF-8 (German umlauts)

When sending POST data from a JSP to a Servlet, it may encouter that they won’t get encoded properly. This effect especially occurs by using german umlauts. It seems that the POST data arrived in the wrong encoding, but that’s what just did not happen. The standard character encoding in Tomcat is ISO-8859-1, which won’t work for the umlauts. To force Tomcat to use UTF-8, do the following:

web.xml (as child of the web-app element):

1
2
3
4
5
6
7
8
9
10
11
12
13
14
15
<!--CharsetFilter start-->
    <filter>
        <filter-name>Filter Encoding</filter-name>
        <filter-class>my.package.FilterEncoding</filter-class>
        <init-param>
            <param-name>requestEncoding</param-name>
            <param-value>UTF-8</param-value>
        </init-param>
    </filter>
 
    <filter-mapping>
        <filter-name>Filter Encoding</filter-name>
        <url-pattern>/*</url-pattern>
    </filter-mapping>
    <!--CharsetFilter end-->

Add a class named “FilterEncoding.java” in my.package with this code:

1
2
3
4
5
6
7
8
9
10
11
12
13
14
15
16
17
18
19
20
21
22
23
24
25
26
27
28
29
30
package my.package;
 
import java.io.*;
import javax.servlet.*;
 
public class FilterEncoding implements Filter {
    private String encoding;
 
    public void init(FilterConfig config) throws ServletException {
        encoding = config.getInitParameter("requestEncoding");
 
        if (encoding == null) {
            encoding = "UTF-8";
        }
    }
 
    public void doFilter(ServletRequest request, ServletResponse response, FilterChain next)
            throws IOException, ServletException {
        // Respect the client-specified character encoding
        // (see HTTP specification section 3.4.1)
        if (null == request.getCharacterEncoding()) {
            request.setCharacterEncoding(encoding);
        }
 
        next.doFilter(request, response);
    }
 
    public void destroy() {
    }
}

Make sure that all documents are encoded in UTF-8 also, as well as the database.
For JSPs: <%@page contentType="text/html" pageEncoding="UTF-8"%>

Also see: Tomcat Wiki

Hiding an empty section in CrystalReports

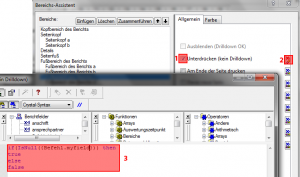
Recently I had to hide a section in CrystalReports (Visual Studio Designer) when a specific variable becomes null. Right-click the section to be hided and open the section expert. Set up as follows:

Surpress Section

  1. Surpress (no drilldown)
  2. Add formula
  3. Insert the following into the editor:
1
2
3
4
if(IsNull({Befehl.myfield})) then
true
else
false

Distinct Rows in DataTable

After writing some Comparers and other stuff, I realized that there is a very simple method to
get a DataTable without duplicate DataRows. The way it works is described here:
http://www.c-sharpcorner.com/blogs/BlogDetail.aspx?BlogId=230

In fact it is one simple line to get the distinct rows:

1
DataTable distinctTable = originalTable.DefaultView.ToTable(true);